5 Ardiuno Kits for Global Warming projects
Arduino Kits to Test ideas that could solve Global Warming
Climate Change is real, and it is happening around us as we speak. We see different effects of it in different parts of the world, but we must work together to solve it. Whether pollution, rising temperatures or irregular rain, we need to find ways to prevent further changes and survive until we do.

Every real problem needs real solutions. That's why it is upto Makers like us to ideate, test, prototype and validate potential solutions to this issue. Luckily, there are several open source tools and modules around the Ardiuno platform that you can use to demonstrate your ideas. If you think you have a way to solve it, build it and share it! You live in an open-source world. If you have an idea, just DIY it!
Here are 5 Arduino Kits and Modules you can use to for Global Warming Projects:
- Arduino Uno Weather Station Kit | Rs. 999 | Get it Here
- NodeMCU WiFi IoT Weather Station Kit | Rs. 950 | Get it Here
- Light + Temperature + Relay Module for Arduino | Rs. 399 | Get it Here
- Moisture Sensor for Arduino | Rs. 148 | Get it Here
- Hazardous Gas Detection Module | Rs. 229 | Get it Here
Let's get into some detail with each one
1. Arduino Uno Weather Station Kit

Kit Contents:
- 1x Arduino Uno R3 branded Clone + USB Cable
- 1x DS3231 Real Time Clock module
- 1x DHT11 temperature sensor
- 1x 0.9" OLED display with 4 pins
- 1x 400 Pin Mini Breadboard
- 40x Jumper Cables (M-M / M-F)
How to get started:
First Set up the DHT11 Sensor to the Arduino. Follow this guide.
Then connect the OLED Display. Follow this guide.
You can connect the RTC for timekeeping. Follow this guide (Use this code for further reference).
Now you can use the Temperature and Humidity values from the DHT11 Sensor to display information on the OLED Display. Additionally, you can also grab the current time value from the RTC Module and display the time of the readings as well.
Using this, you can also calculate changes in the temperature and humidity values based on time and display your findings.
2. NodeMCU WiFi IoT Weather Station Kit
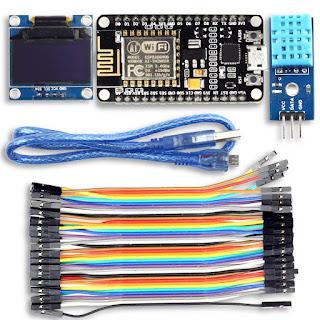
Kit Contents:
- 1x NodeMCU WiFi Development Board (Arduino Compatible)
- 1x USB Cable
- 1x DHT11 Temperature/Humidity Sensor
- 1x 0.96" 128x64 I2C OLED Display Module
- 40x Jumper Cables (F-F)
How to get started:
First use this example to set up the DHT11 and OLED Display with your NodeMCU.
Use the code and examples provided there.
This arrangement will allow you to detect the Temperature and Humidity Values at the location of your setup. Since the NodeMCU can connect to the WiFi, you can even send this information to another server, or access it using your Smartphone.
This is a great place to start working with IoT.
Refer to these examples to add IoT capabilities to your Weather Station Project:
3. Light-level + Temperature + Relay Module for Arduino

Use it with:
Arduino Uno Absolute Basics Kit
NodeMCU Basic Kit
Onboard functions:
- Indicator LEDs
- NO/NC Relay for 250VAC Control
- LDR Light Sensor
- LM35 Temperature Sensor
- IR Receiver
- Buzzer
- Potentiometer
- Push Buttons
- Headers for direct connection to Arduino Board
How to get started:
- Connect the 5V pin from the Arduino to the 5V of this Module
- Connect the GND pin from the Arduino to the GND of this Module
- Now assign Arduino Pins to functions of the Module
For example, if Arduino Pin13 is used as the Relay control pin, declare it as an output pin with pinMode(13,OUTPUT).
Now in your sketch, when you output HIGH and LOW on this pin, the relay will switch accordingly.
Similarly, try the Analog inputs from the Sensors like LDR by declaring for example pinMode(12,INPUT) in your Arduino Sketch. You will now receive the Sensor value as an integer between 0 and 1023 on Arduino Pin12 with analogRead(12). Use these values to control other functions or inform your logic. Your imagination is the only limit from here.
4. Moisture Sensor for Arduino

Kit Price: Rs. 148
Arduino Beginner Level: 3
See this Kit on Amazon
Use it with:
Arduino Uno Absolute Basics Kit
NodeMCU Basic Kit
Kit Contents:
- 1x Moisture Sensor Probe
- 1x Comparator Mini PCB for Digital Output
- 5x Jumper Cables (F-F)
How to get started:
- Connect the Probe Pins to the Comparator Input
- Connect the Comparator output to the Arduino
- Insert the Probe into the soil to measure moisture
- Follow this example to set up the project and code
Once your setup is done, you will be able to see the result of the moisture sensing with respect to the threshold set on the Comparator. To change the threshold, simply turn the Potentiometer on the Comparator board.
Your result from the Comparator will be binary - HIGH or LOW. This can help you know how fast the soil dried, when your plants need watering and when they were last watered. Another great application of this is in smart agriculture and farming.
5. Hazardous Gas Detection Module

Kit Price: Rs. 229
Arduino Beginner Level: 3
See this Module on Amazon
Use it with:
Arduino Uno Absolute Basics Kit
NodeMCU Basic Kit
Module Features:
- Detects PPM in surrounding air
- Analog output based on PPM level
- Works with ammonia, aromatic compounds, sulfur, benzene vapor, smoke and other gases
How to get started:
- Follow this guide
- Use Jumpers to connect the Gas Sensor Module to the Arduino
- Once connected, use the Arduino Sketch to receive Sensor PPM Values
- Use these Sensor Values to display or inform other logic and functions in your project
Pollution is one of the major reasons for Global Warming. One of the best ways to solve the problem of Climate Change is by solving the problem of Pollution. This Sensor lets you measure pollution and amount of Gas in the surroundings. Inform your project with this information to come up with a potential solution.
These Kits should help you get started with Arduino Projects driven by a meaningful cause. Be the change you want. The best way to change the world is by finding solutions and demonstrating them.
All the best!

A deposit bonus, also known as|also called|also referred to as} deposit match bonuses, gives you one thing additional when you add funds to your account. Any deposit 퍼스트카지노 presents that come after your preliminary transaction are called reload bonuses. In fact, you'll discover that most all} casinos run a welcome bonus with a deposit match attached to it. Many of the bonus codes we provide nevertheless provide you with an exclusive freebie when you register a new new} account by way of this page.
ReplyDeleteMobile phones are often "SIM unlocked," allowing the user to insert a SIM card from any network provider worldwide. Many mobile phones are "SIM locked" by the service provider in accordance with the contract you sign, often until the end of the contract time. In contrast to the prior scenario, these phones cannot use a different Worldwide IoT SiM Card.
ReplyDelete