ESP8266 Arduino WiFi Setup | NodeMCU Arduino Projects – Get Started
Setting up the ESP8266 NodeMCU Module

What is the ESP8266?
ESP8266 is an Embedded System-on-a-Chip (SoC) that has inbuilt WiFi and TCP/IP (Internet Standard) communication support.For all practical purposes, it is a chip that can be programmed to do tasks that involve connecting to a WiFi network and communicating with other devices on the network via TCP/IP (Internet Standard) Protocols.

Some explanations before starting :
- What is an SoC? An independent self-sufficient device that only needs to be powered up to carry out its bare functions. In most applications, the ESP8266 is used together with other electronics systems like LEDs and Push Buttons, which augment the ESP's bare functions.
- How can I run the ESP8266 SoC? Once it is programmed, you only need to power it up with a reliable 3.3V Power Supply. As long as the operational environment is normal, it will function smoothly. The NodeMCU Board is a development board that houses this SoC. The NodeMCU lets you use the ESP8266 at 5V levels.
- How can the ESP8266 communicate? It has an inbuilt WiFi chip, and firmware support for using these capabilities in your program. You can use its libraries and program it to do various WiFi based tasks, including scanning for networks, connecting to a network, communicating with TCP/IP protocols (HTTP, MQTT, UDP, etc.), and much more.
- Can two ESP8266 or NodeMCU modules communicate with each other? Yes. You can program ESP8266s to communicate via the various TCP/IP protocols. They can communicate with each other as well as other entities on the Internet.
- How do we program it? By connecting it to a PC via a USB programmer, or by using a ready-made development board like the NodeMCU with the USB programmer built in. Once connected, you can flash programs to it just like you program any other Arduino board.
- What else can the ESP8266 do? The ESP has an 80MHz 32 bit microprocessor with 4MB of flash memory (including the program memory). It has 0.5 kB of internal EEPROM. It has support for Serial communication using GPIO pins, 9 GPIOs with PWM support and one ADC pin, among other capabilities. It is more powerful than the Arduino Uno, has more storage and RAM, and additionally has WiFi and TCP/IP capabilities. It can be used to create a smart IoT systems for various applications.
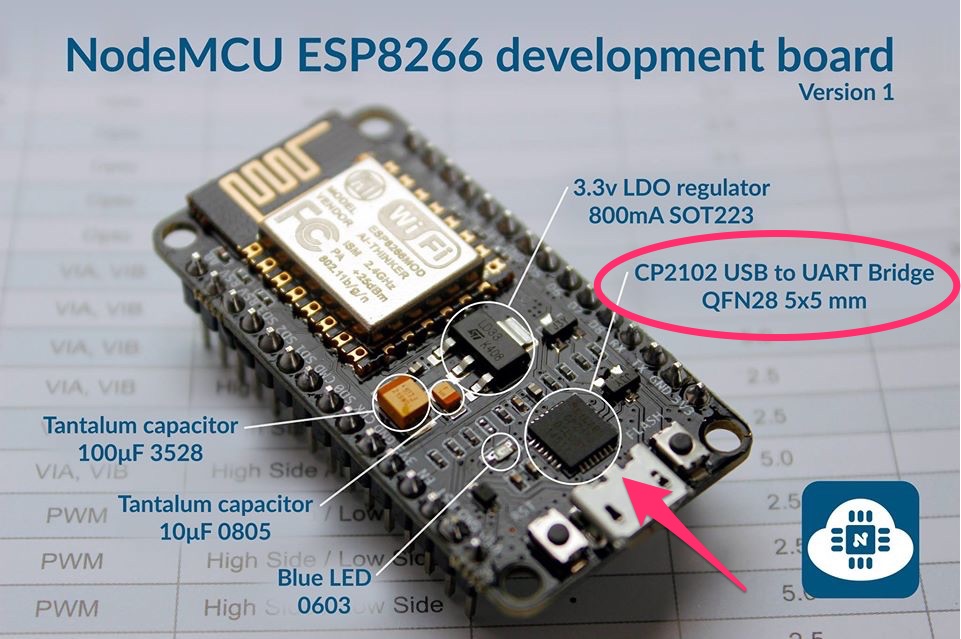
The NodeMCU
 |
| NodeMCU - the ESP8266 Development Board |
The NodeMCU is a development board built around the ESP8266 SoC.
Get started with a Starter Kit.
Just like the Arduino Uno makes it easy to access the capabilities of the Atmege328 Microcontroller, the NodeMCU makes the ESP8266 SoC accessible to programmers using the Arduino IDE.
It is simply a development board for the ESP8266. It standardizes all the functionalities of the core ESP8266 module and adds essential hardware, communication and programming capabilities. It adds:
- A regulated Power Supply (allowing you to power it using a Laptop USB port or a Mobile Charger. The ESP2866 doesn't have this capability by itself.)
- USB to Serial converter (for USB communication and programming)
- A Reset button
- Breadboard-friendly GPIO pin-outs (You can mount it on a breadboard for projects)
- On-board LED indicators
- Other support circuits

With the NodeMCU, programming and testing the ESP8266 becomes as easy as plugging it into your PC's USB port and programming it using the Arduino IDE.
Setting up NodeMCU to work with the Arduino IDE
- Install the board on the Arduino IDE
This makes the NodeMCU appear in the Boards menu, so you can select it before programming your NodeMCU - Install the ESP8266 Core for Arduino
This is a package containing libraries and support files to make development with the NodeMCU easy
Before proceeding, make sure that you have a decent internet connection available and a recent version of the Arduino IDE installed.
Installing the Board
To install the board, follow these steps:1. Open the Arduino IDE


http://arduino.esp8266.com/stable/package_esp8266com_index.json

5. Click on OK and close the IDE
6. Reopen the Arduino IDE and navigate to Tools -> Board -> Board Manager

8. Once it completes, you should find an entry called 'esp8266' by ESP8266 Community. Click on 'Install'.

9. Once this completes, close the Arduino IDE and reopen it
10. Now go to Tools -> Boards and scroll down the list. You should see a section called esp8266 modules
11. Under this section find NodeMCU 1.0 - this is the one to use with NodeMCU boards
Installing Libraries from the ESP8266 Core
The ESP8266 core is an open source package containing libraries, functions and other tools that ease ESP8266 development using the Arduino IDE.To install it, follow these steps:
1. Go to https://github.com/esp8266/Arduino and click on Clone / Download -> Download as Zip

2. Once the package downloads, unzip it
3. In the extracted folder, there will be a sub-folder called 'libraries'
4. Open this folder, select all the contents and Copy them (Ctrl + C)
5. Now open the directory where you installed your Arduino IDE ("C://Program Files (x86)/Arduino" or similar for Windows. Not the My Documents one)

6. Here there is a 'libraries' folder. Open it and paste the copied files there
7. Now restart the Arduino IDE
8. Navigate to File -> Examples and scroll down. You should see some ESP8266 entries in this list. If you see them, the ESP8266 core was installed properly.

9. Now you can use all the copied ESP8266 libraries for WiFi development using the Arduino IDE
Writing your first program on the NodeMCU
Your first program on the NodeMCU Module should be a pre-installed example from the Arduino IDE. Here are the steps to install and run the blink program on a NodeMCU.Follow these steps:
1. Open the Arduino IDE and plug in the NodeMCU
2. Navigate to File -> Examples -> Basics -> Blink
3. Replace the pin number '3' with 'D4' everywhere.
(For example: pinMode(3, OUTPUT) becomes pinMode(D4, OUTPUT))
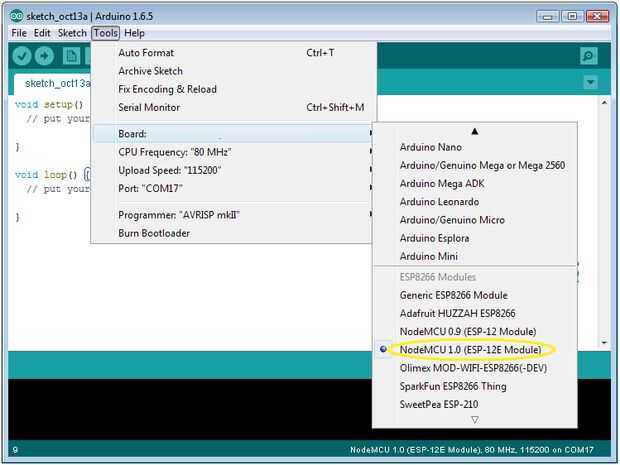
4. Once all the replacements are done, navigate to Tools -> Board and select NodeMCU 1.0 (ESP-12E)
5. Now go to Tools -> Port and select the right USB port
6. Now Click on Upload (Ctrl + U)
7. Once the upload is done, a Blue LED will start blinking on the NodeMCU
8. Congrats, you just programmed the NodeMCU!

Now that you have the NodeMCU set up and ready to go, try surfing the internet using it with this tutorial.
Advanced IoT projects are very easy to implement on the NodeMCU, and it also connects very easily to Sensors and other Modules.
This should help you get started with your IoT development journey. Hope you build something great!
Leave a comment here and let us know what you think.
Do follow Device Interactions on Facebook and Instagram. We post a lot of cool stuff there.
Ask us anything on Quora.
Check out more from our Tech Blog - for Tutorials like this one, guides to use online resources and other great stuff.

Comments
Post a Comment