NodeMCU Projects | Arduino IoT Project for Beginners
Cool IoT Arduino Project for beginners - A Bot that tracks Forex Rates

What is IoT?
IoT or the Internet of Things refers to the phenomenon of devices connected to the Internet autonomously talking to each other, sharing information and events in order to automate tasks and offer capabilities that were previously unthinkable. An example of this is the way Smartphones now enable us to order cabs and track them in real time - this was unimaginable 15 years back.IoT is no longer a distant buzzword, but is now something all of us can experiment with using only some programming knowledge. Thanks to open source resources like Arduino, this is getting easier and easier to work with.

The project described here makes use of the principles of IoT, by connecting to a Web Server, receiving data and then using that data to manipulate some physical hardware - in this case, LED lights. This can be easily extended to any additional physical hardware.
The Forex Tracker Mini Project
Introduction
Forex is short for Foreign-Exchange, meaning the values of international currencies with respect to each other. These values keep changing by the second, based on economical, social and political factors. This is a great area to trade in, especially if you have a knack for numbers and statistics.For the people out there that are interested in Foreign Exchange, knowing the real-time values of these currencies is of utmost importance, because it helps them decide when to buy, sell and hold.

This is an example of the use of IoT in Arduino based projects to track data on the internet.
Components needed
For this project you will need:- An Arduino Uno with USB cable

- An ESP8266 NodeMCU Module

- A Breadboard

- 3 LEDs - Red, Yellow and Green

- 3 Resistors (330 Ohm each)

- Jumpers Wires


How this Project Works
This project works by first connecting to your WiFi and then reading the Forex information by opening a website.
This is done using an HTTP GET function. This is the same protocol your browser uses while surfing the internet.
To read more about that, refer to this article about Surfing the Internet with the ESP8266.

The website is received by the NodeMCU program and the appropriate information is separated and used. This HTTP call is made every 10 seconds, and new values are received from the website each time. Based on these changing values, the LEDs are programmed to light up.
When a rise is detected, it lights up the Green LED.
When no change is detected, it lights up the Yellow LED.
When a drop in value is detected, it lights up the Red LED.
This can then be used as a real-time visualisation of the Forex Values.
Setting up this Project
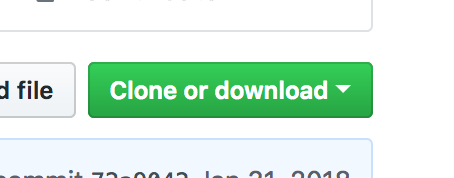
First, get the code from Github :
- Open https://github.com/deviceinteractions/tutorial-esp8266-forex-tracker to get the Arduino IDE code for this tutorial

- Go through the Readme on the Github Page

- Click on 'Clone or Download' and select download Zip. (If you are familiar with git, you can just clone it from the command line).


Set up and flash the ESP8266 sketch with these steps :
- Once it is downloaded, open the 'forex-tracker-ESP.ino' file with your Arduino IDE
- Here, replace the WIFI_SSID and WIFI_PASS values with your actual WiFi network details
- Save this
- Plug in a NodeMCU via USB and select the NodeMCU Board and Port from the 'Tools' menu
- Now click on Upload (Ctrl + U)
This will upload the code to the NodeMCU. The NodeMCU is now ready for use.
Set up the Arduino Uno with these steps :
- Plug in the Arduino Uno into the PC's USB Port
- Open the 'forex-tracker-arduino.ino' sketch in the Arduino IDE
- In the Tools menu, select the right port and the 'Uno/Genuino' board
- Upload this sketch to the Arduino Uno
Once this is uploaded, your Arduino Uno will be ready for use.

Make the Connections
Both the modules are now programmed.Now you need to make the connections between the NodeMCU and the Arduino as well as as from the Arduino pins to the LEDs.
Insert the NodeMCU, LEDs and Resistors on the Breadboard. Use the jumper wires to make the connections on the breadboard and the Modules.
Here is how you can hook these components up:

Notice that the power pins - 5V and GND are shared. This means that you only need to connect the USB to one of the modules, and they will both be powered up.
Make sure you have a working internet connection on your WiFi before starting. If not, you can also use your mobile Hotspot.

Once it is hooked up, remove the USB from the Arduino Uno and connect the NodeMCU to the PC over USB. This will power up the system, and it will start working.
To see what's happening behind the scenes, open the Serial Monitor and press the Reset button on the NodeMCU. You will start getting a Serial debug stream of the program.
The Serial Monitor will show the Forex Rates changing, and the connected LEDs will reflect the changes every 10 seconds accordingly:
Green LED - Rise in Forex Rate
Yellow LED - No change in Forex Rate
Red LED - Fall in Forex Rate

Further Experiments
You can do this project without the Arduino Uno as well. Here it simply acts as an additional board for more GPIO based capabilities. This arrangement introduces you to Serial Communication between the NodeMCU and the Arduino Uno.To do that, simply connect the LEDs to GPIO pins on the NodeMCU and add code to control these LEDs in the NodeMCU Code, just where the NodeMCU sends the Serial message to the Arduino Uno. Once this is done, you won't need the Serial communication with the Arduino Uno at all. In fact, you can now implement this project without the Arduino Uno.

Try this!
An advanced way of working with data on the internet is via APIs. APIs are well-defined ways to connect to Servers and request specific information. Usually API connections are slightly more complicated, with some security keys and forced encryption. But they too usually use the HTTP protocols to work.
Hope this helps you build something awesome!
Leave a comment here and let me know what you think.
Do follow Device Interactions on Facebook and Instagram. We post a lot of cool stuff there.
Ask us something on Quora too.
Check out more from our Tech Blog - for Tutorials like this one, guides to use online resources and other great stuff.

clearly, It is an engaging article for us which you have provided here about Forex rebate program This is a great resource to enhance knowledge about it. Thank you.
ReplyDeleteYou have provided a richly informative article aboutgreen underwater lightsIt is a beneficial article for me and also helpful for those who are searching for this kind of information. Thanks for sharing this information here.
ReplyDeleteI appreciate your efforts which you have put into this article. This post provides a good idea about Bitcoin exchange canada. Genuinely, it is a useful article to increase our knowledge. Thanks for sharing such articles here.
ReplyDeleteThe representation of this article is actually superb. I think this is a genuinely beneficial and instructive article for everyone, I appreciate this kind of writing, Thankful to you for sharing an article like this.Ethereum Price Eur
ReplyDeleteok
ReplyDeleteSelect a pay-as-you-go to demonstrate our data-pooling choice to maintain a strategic distance from startling costs and guarantee you merely pay for information your gadgets utilize. Select the estimate of your arrangement, select your wanted scope, and choose an estimating demonstration. IoT SIM Card
ReplyDeleteVery good post and I found lots of information that is very helpful, So, thanks for sharing Write for us Crypto
ReplyDelete