Inside the Arduino IDE Software | How does the Arduino IDE Work?
Have you ever wondered what actually happens under the hood of the Arduino IDE, what the 'Compile' and 'Upload' buttons actually do, and how the IDE can connect to the Arduino Board so easily?
Let's break it down.
The Arduino IDE is really the heart of what Arduino does - making electronics prototyping fast and easy. It automates most of the work that you would otherwise have to do, and takes care of the unnecessary details by itself.
Get one for yourself with Amazon here.
What is the IDE?
The IDE is an Integrated Development Environment - which means that it lets you author the code, validate it, compile it, upload it, verify it and then interact with your programmed board - all from a single Application. It is a thoughtfully designed application, allowing a modular approach to setting up different boards to develop on, and actively involving the developer community to contribute.
To author the code, the IDE provides a text editor with colour-codes for the different parts of the syntax, line numbers, code block folding, formatting and saving. So writing your C code becomes extremely comfortable. Let's not compare this with advanced code editing software, because code editing is only a small part of the package that the IDE provides
To Compile and Validate the code, the Arduino IDE uses the installed compiler, as defined by the settings of the board you are using. For example, when you use the Arduino Uno, the GNU-GCC compiler is used to validate and convert your C code to Intel Hex code.
The compiler is what catches errors and raises warnings about the code, and ensures that the code is validated before actually generating the Hex file from it.
To Upload and Verify the code, the IDE calls a corresponding tool, based on the board you are using. For example, the Arduino Uno (and other Atmel uC based boards) uses a tool called Avrdude, which writes the compiled code to the microcontroller. Avrdude also allows access to the flash and eeprom memory of the chip, among other functions.
To Interact with the microcontroller, the IDE makes use of a corresponding UART tool based on the board being used. The UART interface requires the driver for each board to be installed, and takes care of the programming and functioning of the Serial Monitor. And since the IDE has already taken care of the driver installation while adding your boards (not to mention the default boards that come with the IDE), you don't even need to bother.
The Serial Monitor allows a developer to view all the UART messages received from the Board as well as write UART messages to the board from a separate window.
How can you track these activities?
There is an option on the preferences page that lets you enable the full verbose (detailed) output from the behind-the-scenes action.
You need to open the IDE, navigate to 'Tools' -> 'Preferences'. This opens a dialog box with all the preferences to customize the feel and behaviour of the IDE.
There you will see options like Code Folding, Line Numbers, and other options.
Among these is the 'Show Verbose Output'. You can select the verbose output to display for either Compilation, Upload or both. Once you select both, try uploading a program to your board, and look for the detailed logs that will appear at the bottom section of the IDE.
This will contain a detailed summary of the entire process.
How is this different from other IDEs?
The Arduino IDE was designed based on its core mission of making Electronics prototyping easy for non-technical and inexperienced developers and school kids. Keeping that application in mind, the entire Arduino package has done wonders in revolutionising the Electronics DIY culture. It made it much easier and much less intimidating for noobs to take on Electronics.
Another thing that the Arduino IDE could do was encourage manufacturers of microcontrollers and processors to add support on it. So the Arduino IDE provides an almost seamless way of enabling development on many other platforms apart from Atmel microcontrollers. The ESP8266 Core, for example, lets developers get the IDE set up for development on the ESP SOC.
There are a number of other IDEs out there, and a lot are platform-specific, like Atmel Studio and the MPLab for PIC development.
What's also great is that the Arduino IDE encourages developers to independently add support and libraries for various platforms to the Arduino infrastructure, making it a user-sourced platform.
Author: Ranjit Bhinge | www.ranjitbhinge.com
Device Interactions is a Product Development Studio and supports the Maker Movement
www.device-interactions.com | shop.device-interactions.com | blog.device-interactions.com
Let's break it down.
The Arduino IDE is really the heart of what Arduino does - making electronics prototyping fast and easy. It automates most of the work that you would otherwise have to do, and takes care of the unnecessary details by itself.
Get one for yourself with Amazon here.
What is the IDE?
The IDE is an Integrated Development Environment - which means that it lets you author the code, validate it, compile it, upload it, verify it and then interact with your programmed board - all from a single Application. It is a thoughtfully designed application, allowing a modular approach to setting up different boards to develop on, and actively involving the developer community to contribute.
 |
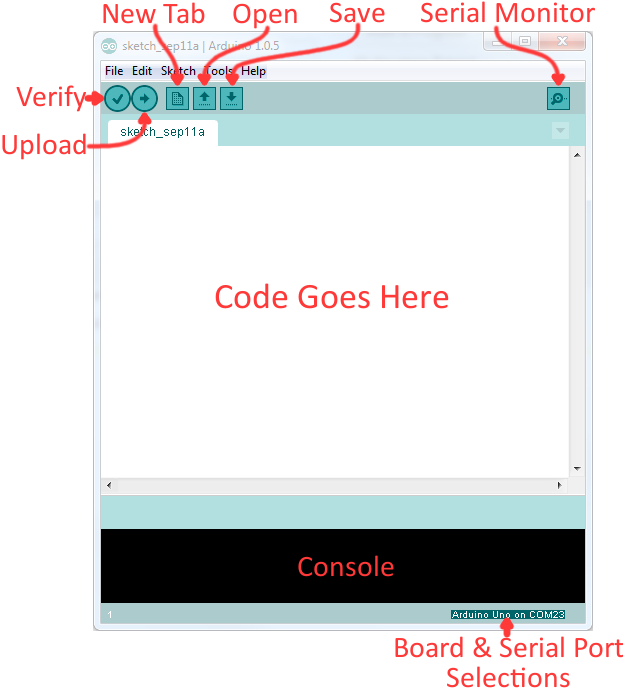
| The Arduino IDE GUI |
To author the code, the IDE provides a text editor with colour-codes for the different parts of the syntax, line numbers, code block folding, formatting and saving. So writing your C code becomes extremely comfortable. Let's not compare this with advanced code editing software, because code editing is only a small part of the package that the IDE provides
| You may choose to use any other text editor to write sketches, and use the IDE for its other functions |
To Compile and Validate the code, the Arduino IDE uses the installed compiler, as defined by the settings of the board you are using. For example, when you use the Arduino Uno, the GNU-GCC compiler is used to validate and convert your C code to Intel Hex code.
The compiler is what catches errors and raises warnings about the code, and ensures that the code is validated before actually generating the Hex file from it.
| Different ways of using avrdude to talk to the Microcontroller |
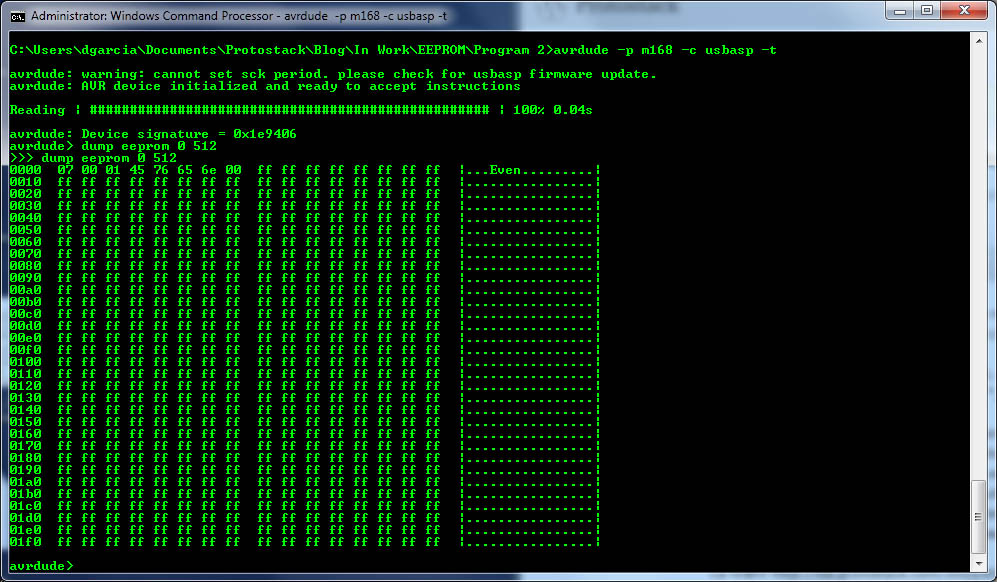
To Upload and Verify the code, the IDE calls a corresponding tool, based on the board you are using. For example, the Arduino Uno (and other Atmel uC based boards) uses a tool called Avrdude, which writes the compiled code to the microcontroller. Avrdude also allows access to the flash and eeprom memory of the chip, among other functions.
 |
| Reading the EEPROM contents with avrdude |
To Interact with the microcontroller, the IDE makes use of a corresponding UART tool based on the board being used. The UART interface requires the driver for each board to be installed, and takes care of the programming and functioning of the Serial Monitor. And since the IDE has already taken care of the driver installation while adding your boards (not to mention the default boards that come with the IDE), you don't even need to bother.
The Serial Monitor allows a developer to view all the UART messages received from the Board as well as write UART messages to the board from a separate window.
How can you track these activities?
There is an option on the preferences page that lets you enable the full verbose (detailed) output from the behind-the-scenes action.
You need to open the IDE, navigate to 'Tools' -> 'Preferences'. This opens a dialog box with all the preferences to customize the feel and behaviour of the IDE.
There you will see options like Code Folding, Line Numbers, and other options.
Among these is the 'Show Verbose Output'. You can select the verbose output to display for either Compilation, Upload or both. Once you select both, try uploading a program to your board, and look for the detailed logs that will appear at the bottom section of the IDE.
This will contain a detailed summary of the entire process.
How is this different from other IDEs?
The Arduino IDE was designed based on its core mission of making Electronics prototyping easy for non-technical and inexperienced developers and school kids. Keeping that application in mind, the entire Arduino package has done wonders in revolutionising the Electronics DIY culture. It made it much easier and much less intimidating for noobs to take on Electronics.
| The Uno R3 with the IDE standardised a lot of the Atmega's functionalities and made Electronics approachable to beginners |
Another thing that the Arduino IDE could do was encourage manufacturers of microcontrollers and processors to add support on it. So the Arduino IDE provides an almost seamless way of enabling development on many other platforms apart from Atmel microcontrollers. The ESP8266 Core, for example, lets developers get the IDE set up for development on the ESP SOC.
There are a number of other IDEs out there, and a lot are platform-specific, like Atmel Studio and the MPLab for PIC development.
What's also great is that the Arduino IDE encourages developers to independently add support and libraries for various platforms to the Arduino infrastructure, making it a user-sourced platform.
Author: Ranjit Bhinge | www.ranjitbhinge.com
Device Interactions is a Product Development Studio and supports the Maker Movement
www.device-interactions.com | shop.device-interactions.com | blog.device-interactions.com


Comments
Post a Comment